
Phalaenopsis Orchid Care: A Comprehensive Guide
Phalaenopsis orchids are popular for indoor and outdoor gardens with their gorgeous blooms. The Phalaenopsis orchid is one of the most popular and widely available types of orchid.
These beautiful flowers are relatively easy to care for, making them a good choice for beginner orchid growers & they come in a wide range of colors, sizes, and shapes. However, they still require some specific care to thrive.
With proper care, a Phalaenopsis orchid can bloom for several months at a time. But there are a few things you need to know to keep your orchids healthy and happy.
In this article, we will go over everything you need to know about phalaenopsis orchid care for beginners. We will cover topics such as watering, lighting, temperature requirements, fertilizing, potting, and repotting.
We will also discuss common problems and how to avoid them. By the end of this guide, you will be an expert on Phalaenopsis orchid care.
Now, let's look at the details of all the factors that play a role in the care of phalaenopsis orchids.
The Best Way to Care for Moth Orchids
Undoubtedly, the proper care of orchids is essential to ensure their health and vitality for many years to come. Several factors can adversely affect orchids' blooming ability and growth if inadequate care is provided for them.
You should understand and be aware of some things for orchids to thrive and show their full beauty, such as light, temperature, humidity, watering, and fertilizing requirements.
In this section, we will discuss all factors in detail about What environment does Phalaenopsis orchid like to live in.
Light for Phalaenopsis Orchid
Phalaenopsis orchids, commonly known as moth orchids, need a significant amount of light to grow and flower healthily. It is important to ensure that the plant receives the right amount and quality of light to avoid damaging it.
This section will discuss the light requirements of Orchids and provide guidelines on how to meet their lighting needs.

The Right Balance of Sunlight.
Phalaenopsis orchids thrive in shaded light conditions, typically 1000 to 1500-foot candles. While adequate lighting is essential, exposing them to direct sunlight can be detrimental, leading to scorching of the leaves.
As such, it's advisable to avoid direct sunlight. During the winter season, when sunlight is weaker, placing your Phalaenopsis in a window facing south or east that receives some direct light is suitable.
Ensure to rotate the orchid periodically to promote even growth. When appropriately lit, the leaves of a healthy Phalaenopsis will exhibit a light green color.

Dark green leaves indicate that the orchid does not receive enough light for optimal growth, while light-deprived leaves indicate the orchid is receiving too much light.
On the other hand, excessive light can cause leaf margins to develop a pink or reddish tinge, which eventually orchids leaves turns yellow. It is possible to gauge the lighting conditions for your Phalaenopsis by monitoring the coloration of its leaves.
Artificial Light: Enhancing with Grow Lights
When natural light is inadequate, adding artificial lighting can be beneficial. For Phalaenopsis orchids, fluorescent tubes are a preferred option for supplemental lighting.
It is suggested to select fluorescent tubes with either 40 or 74 wattages, depending on the tube's length. Phalaenopsis plants are ideal for light exposure when placed approximately 12 inches below the fluorescent tube.
LEDs are commonly used for indoor plant growth in the artificial light market, which has expanded significantly in recent years. Using these lights can enhance the growth and flowering of Phalaenopsis orchids by providing the right spectrum and intensity. Choose artificial light sources that provide the right spectrum and intensity for optimal results for your orchids, and consider their specific needs when choosing artificial light sources.
Ultimately, providing the correct lighting conditions is crucial for the well-being and growth of Phalaenopsis orchids.
Temperature Requirements of Phalaenopsis.
Phalaenopsis orchids are a common choice for indoor plants because they thrive in temperatures that are commonly found in homes.
The preferred temperature range for these orchids aligns well with the typical indoor temperature of most households, which can make it easier for them to grow and flower without the need for excessive temperature control.
In this part, we will explore the temperature requirements of Phalaenopsis and how to provide the ideal growing conditions for these stunning orchids.
Intermediate to Warm Conditions
Phalaenopsis orchids thrive in intermediate to warm conditions, making it important to provide them with the ideal temperature range for optimal growth and blooming. To achieve this, maintain a daytime temperature between 70°F to 80°F (21°C to 27°C) to ensure your orchids receive the perfect environment they need.
To ensure optimal growth and encourage the development of beautiful flowers, it's important to maintain slightly cooler nighttime temperatures for your Phalaenopsis orchids.
Aim for a range of 60°F to 65°F (16°C to 18°C) during the night, as this mimics the natural temperature fluctuations these orchids experience in their native habitats.
This cooling effect promotes their overall health and helps trigger the growth of stunning flower spikes. So, make sure to provide your Phalaenopsis with the ideal nighttime temperatures they need to thrive.
Maintaining Temperature Conditions
Here are some tips for maintaining the right temperature conditions for Phalaenopsis orchids:
Location: Ensure that you place your orchids in a well-ventilated area of the house that maintains a consistent temperature within the desired range to ensure success. Avoid exposing them to sudden temperature fluctuations or drafts.
Heating and Cooling: Maintaining orchids in a temperature-controlled environment during winter is important. If your home becomes too chilly, you may need space heaters or heating pads to maintain a stable temperature.
Likewise, in hot weather, avoid placing your orchids in areas with direct exposure to air conditioning or heating vents that could subject them to rapid temperature changes.
Monitoring: It is recommended to keep a close eye on the room temperature where your orchids are placed. Use a thermometer to get an accurate temperature reading, particularly when the weather changes.
Doing so allows you to easily detect any variations that might need adjustment to regulate the temperature within the ideal range.
Temperature Regulation: To maintain a stable and suitable temperature environment for your Phalaenopsis orchids, you are advised to use devices that can regulate temperatures, such as small fans or portable heaters, if necessary.
You can make your Phalaenopsis orchids feel comfortable and nurtured with the right temperature conditions.
Humidity Requirements of Phalaenopsis.
Like all plants, Phalaenopsis has specific needs it must meet to thrive. Humidity is one of the most important factors to consider when caring for Phalaenopsis.
Humidity is the measure of the amount of moisture in the air. It is important for plants because they absorb water through their leaves, which can only happen if the air around them is moist enough.

The Ideal Humidity Range
The ideal humidity range for Phalaenopsis is between 50 and 70 percent. This range is important because if the air is too dry, the orchid will not be able to absorb enough water through its leaves, which can lead to dehydration and wilting.
On the other hand, if the air is too moist, the orchid is susceptible to fungal and bacterial diseases and root rot. So how can you ensure that your Phalaenopsis gets the right amount of humidity? There are several methods you can use:
- Humidity Trays are shallow trays filled with water that you place under your orchid's pot. As the water evaporates, it increases the humidity around the plant.
- Humidifiers - These are devices that emit water vapor into the air, increasing the overall humidity of a room. They are especially useful in dry climates or during the winter months when indoor heating can dry out the air.
- Misting - You can mist your orchid's leaves with a spray bottle filled with water. This method provides a quick burst of moisture to the plant but is not a substitute for regular watering.
- Grouping - There is no doubt that putting several orchids together can create a mini microclimate of increased humidity that can be adjusted.
Important Things to Consider
While it is important to provide sufficient humidity in a room, there are a few precautions that need to be taken as well:
- Avoid Standing Water: Ensure that your Phalaenopsis orchids are not standing in water or overly damp conditions. Excessive moisture around the roots can lead to rot and other fungal or bacterial infections. Use a well-draining potting mix and avoid overwatering to prevent waterlogging.
- Air Circulation: Maintaining optimum humidity levels is vital, but it's equally imperative to guarantee sufficient air movement. Stagnant air can become a fertile ground for pests and diseases to thrive. Therefore, ensuring that the growing space has adequate ventilation and avoiding overcrowding your orchids is crucial.
In addition to these methods, you should avoid placing your Phalaenopsis in areas with drafts or extreme temperature fluctuations. Drafts can quickly dry out the air around your orchid, while temperature fluctuations can stress the plant and make it more susceptible to disease.
How to Get Rid of Ants in the Garden?
Do Indoor Plants Attract Bugs?
Watering Requirements of Phalaenopsis
One of the most important aspects of caring for phalaenopsis orchids is ensuring they receive the proper water. Here we'll explore the watering requirements of orchids and provide some tips to help you keep your plants healthy and thriving.

Watering Frequency: How Often Should I Water Phalaenopsis Orchid?
One of the most common mistakes that orchid growers make is overwatering their plants. While keeping your phalaenopsis orchids hydrated is important, too much water can lead to root rot and other issues.
As a general rule, phalaenopsis orchids should be watered once a week. However, this can vary depending on several factors, including the size of your plant, the potting mix you're using, and the humidity levels in your growing environment.
Watering Issues: Recognizing the Signs
Phalaenopsis orchids require proper watering, and signs of watering problems can indicate a need for adjustment. There are many signs that suggest the orchid isn't receiving enough water, such as yellowing leaf tips, yellowing throughout the oldest base leaves, and droopy orchid leaves.
It's a good idea to check the roots in such cases. Overwatering may have caused the roots to rot, hindering the plant's ability to absorb water. If the roots appear healthy, it is likely that the orchid is being under watered, and the watering schedule should be increased accordingly.
The Best Way to Water Plants.
Phalaenopsis orchids need proper watering according to the following best methods.
Morning Watering: It is recommended to water Phalaenopsis orchids in the morning. It minimizes the risk of bacterial growth and fungal disease by allowing the leaves to dry before nightfall. Watering in the morning also ensures that the orchids have access to moisture throughout the day, promoting healthy growth and nutrient absorption.

Water Quality: Whenever possible, use low alkalinity watering your Phalaenopsis orchids. The best way to obtain clean water is to use rainwater, distilled water, or reverse osmosis water. The advantage of these types of water is that the mineral salts will not accumulate in the potting medium, which can be detrimental to the roots of orchid plants.
Dehumidifier Water: One of the best ways to water your orchids is to collect the water from your dehumidifier and use it to water them. When it comes to watering Phalaenopsis, this water is typically free of minerals and chemicals, making it an ideal option for the plant.
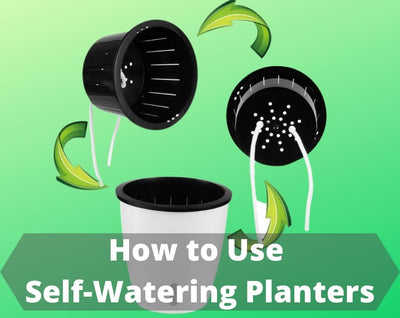
Self-watering planter: When choose planter for Phalaenopsis orchid, what to know
Self-watering planters are another excellent option for caring for orchids conveniently and effectively.
Self-watering planter are available at Planterhoma for sale as an ideal orchid watering system. These innovative planters are designed to maintain a consistent moisture level in the soil, preventing overwatering or underwatering.

The self-watering planter from Planterhoma allows you to be sure that your orchids are receiving the right amount of moisture to ensure that they are able to grow and thrive to their full potential.
Potting Mix: What Soil/moss Should I Use for Phalaenopsis Orchid?
The type of orchid potting mix you use can also affect your plant's watering requirements. Phalaenopsis orchids require a well-draining mix that allows air to circulate the roots. This can be achieved using a mix of bark, perlite, and sphagnum moss.
When watering your orchid, thoroughly water, allowing the water to run through the pot and out the drainage holes. This helps to flush out any built-up minerals or salts in the potting mix.
Leca Balls Are the Best Choice
The Leca balls are an excellent soil option for Phalaenopsis plants, and they can be purchased at Planterhoma. There are several benefits that Phalaenopsis orchids can benefit from using Leca balls, which are made from expanded clay pellets.

They provide a great deal of drainage, which prevents waterlogging and allows the roots to breathe. A Leca ball also retains moisture.
Phalaenopsis orchids thrive in these lightweight and inert balls, which produce a clean, stable growing medium. Leca balls are an ideal soil solution for Phalaenopsis plants, and Planterhoma offers them easy support for their growth and health.
Repotting Requirements of Phalaenopsis Orchids.
Phalaenopsis is one of the most popular orchids worldwide due to its beautiful and long-lasting flowers. However, to keep your Phalaenopsis healthy and blooming, it is important to understand their repotting requirements. This section will discuss everything you need to know about repotting Phalaenopsis orchids.
Timing for Repotting: After Blooming and Root Growth
Generally, it is recommended that Phalaenopsis orchids be repotted in the spring after they have completed their blooming cycle. This post-blooming phase allows it to recover and prevents orchid from dying due to exhausted soil conditions.
And also gain sufficient energy to establish new roots and adapt to its new potting medium after the blooming cycle. Additionally, look for signs of roots growing out of the pot as an indication that repotting is needed.
Frequency of Repotting: Every Two Years
Every two years, Phalaenopsis orchids, particularly adult Phalaenopsis orchids, require repotting. When it comes to these orchids, they can be grown and flourishing in the same pot for a long period of time before they need to be repotted.
It is important, however, to monitor the plant's health and the potting medium's condition to know if a repotting is necessary sooner rather than later.
Pot Selection and Preparation: Clean and Sanitize.
Repotting starts with choosing a new pot slightly bigger than your current one, so you can use it to repot your plants. A few inches or a couple of inches increase in diameter is usually enough to make the difference noticeable.
To prevent waterlogging and promote proper airflow, it is imperative to ensure that the pot has ample drainage holes so there will be no waterlogging. Suppose you are going to repot your orchid. In that case, it is important that you disinfect the pot that will be used after repotting to eradicate any potential bacteria that could harm your orchid.
Make sure that the pot is thoroughly cleaned using a weak bleach solution. To minimize the risk of introducing harmful bacteria to your plant, it is also suggested that you wash your hands and any tools used when you are working with it.
Repotting Process: Steps for Success.
Allow the Pot to Dry: To avoid the possibility of fungal or bacterial growth, it is crucial to ensure that the pot is fully dried after disinfecting it before proceeding with repotting. This helps eliminate excess moisture from the pot.
Prepare the Potting Medium: The pot is filled with a potting mix designed specifically for orchids, like bark or sphagnum moss. These components promote superior drainage and aeration for the roots of the orchid. Before repotting, slightly dampen the potting mix.
Gently Remove the Orchid: It is important to take care when removing an orchid from its pot. Ensure that the roots and stems are not damaged. If there are any brown or mushy roots, trim them away with sterile pruning shears.
Place Orchid in the New Pot: When transplanting your orchid to a new pot, carefully place the plant in the center and ensure the roots are evenly spread. Then, gently add the potting medium around the roots, making sure they are securely covered but not overly compressed.
Mist and Monitor: Once you have repotted your orchid, give it a light misting along with its potting medium. This helps to settle the medium and gives the plant initial moisture. Afterward, place the orchid in a suitable location with the proper lighting conditions and closely monitor it.
Root Development: To encourage root growth and establishment of your orchid, it's recommended to mist it on a daily basis until new roots start to appear. This will create a humid environment that is conducive to root development. After new roots have emerged, make sure to adjust your watering routine accordingly.
Fertilizer Requirements of Phalaenopsis
Proper fertilization is critical to ensure the healthy growth and blooming of orchids. There are several factors that should be considered when fertilizing Phalaenopsis, including the time, frequency, and type of fertilizer to use.
Timing of Fertilization: Growing Season vs. Flowering Season
The fertilizer requirements for orchids vary based on when they are in their growing season and when they are in their flowering season.
Fertilization schedules need to be adjusted accordingly in order to ensure that the plants receive the nutrients they need to grow and bloom at their best.
Growing Season Fertilization: Summer Months
The Phalaenopsis orchid’s active growing season, which generally takes place between June and August, makes it necessary for the orchids to be fertilized regularly.
Using a diluted fertilizer specifically formulated for orchids every third or fourth week is a good way to ensure that the foliage and roots are provided with the nutrients they need to flourish.
Dilute the fertilizer according to the instructions on the package to avoid over fertilization, which can lead to salt buildup and damage to the roots.
Flowering Season Fertilization: Fall, Winter, and Spring
During the flowering season, Phalaenopsis orchids require a break from fertilization, as opposed to the growing season. Too much fertilizer during this period can result in excessive foliage growth at the expense of blooms.
It is important to allow the orchid to allocate its energy toward flower production rather than leaf development. Therefore, it is recommended to skip feedings during this period of time so that the blossoms become healthy and vibrant.
Bloom Booster Fertilization: September or October
During September or October, some orchid growers like to give their Phalaenopsis orchids bloom booster treatments. Using a bloom booster fertilizer can encourage the orchid to produce more blooms since it is specially designed to promote flowering. Fertilizer application and dilution ratios should be followed according to the fertilizer package.
Application Tips
Here are some tips for fertilizing Phalaenopsis orchids effectively.
- Dilution: It is always advisable to dilute liquid fertilizers according to the instructions offered on the package before using them. A poorly fertilized orchid will be unable to grow properly as its roots will be damaged by over fertilization.
- Watering Routine: Fertilize Phalaenopsis orchids when watering, as this helps distribute the nutrients evenly throughout the potting medium. Avoid fertilizing when the potting medium is dry to prevent fertilizer burn.
- Observation and Adjustment: It is important to keep track of whether or not the orchid is responding to fertilization. Over fertilization will cause brown, burnt tips on the leaves or stunted growth on the plants, so if you notice signs of over fertilization, you should reduce the concentration or frequency of fertilization.
Conclusion
Phalaenopsis orchids are beautiful and elegant plants that require some attention and care to thrive. By providing them with the right amount of light, water, and fertilizer and ensuring proper drainage, humidity, and temperature, you can help your orchids grow healthy and strong.
You can enjoy your Phalaenopsis orchids' stunning flowers and lush foliage for years with patience and dedication. Always observe your plants closely and adjust your care regimen to ensure their continued success.
FAQs
How Do You Take Care of a Phalaenopsis Orchid at Home?
To take care of a Phalaenopsis orchid at home, make sure it is exposed to indirect sunlight, water it once a week or when the top inch of soil is dry, and fertilize it during its growing season.
Additionally, ensure proper drainage and avoid overwatering or exposing it to extreme temperatures. Finally, ensure the orchids are kept in a humid environment, as they thrive in moist conditions. With these tips, you can keep your Phalaenopsis orchid healthy and beautiful.
Do Phalaenopsis Like Sun or Shade?
Phalaenopsis orchids prefer bright, indirect sunlight and should be protected from direct sunlight as it can scorch their leaves. It is recommended to place them near a window with sheer curtains or in a well-lit room that receives plenty of natural light.
Does Phalaenopsis Need Full Sun?
Phalaenopsis orchids do not need full sun, and Direct sunlight can damage their leaves and cause them to wilt. Instead, they prefer bright, indirect light near a window with a sheer curtain or on a shaded patio. It is important to monitor the amount of light your Phalaenopsis orchid receives and adjust its placement accordingly.
Read More About Orchid Care
Why Orchid Stem is Turning Yellow?
Where to Cut Orchid Stems After Bloom?


Leave a comment